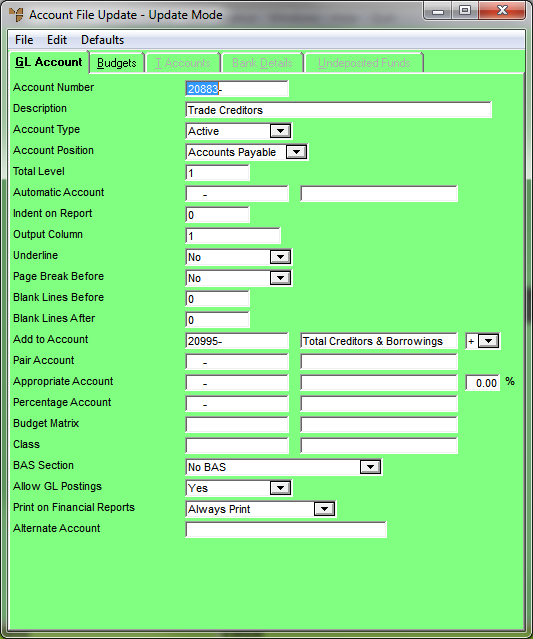
You use the Account File Update screen - GL Account tab to enter the general account details for a GL account.
Refer to "Adding a New GL Account" or "Updating a GL Account".
|
|
Field |
Value |
|
|
Account Number |
Enter the unique number you assign to each GL account. If you are using the Micronet standard Chart of Accounts, this is a five digit number, e.g. 41230 (Sales). Dashes only appear at this option when department prefixes or sub-account suffixes have been set on the MGL General Configuration screen, e.g.:
For more information on setting account prefixes and sub-account suffixes, see "Edit - General Ledger Config - General Ledger Setup". |
|
|
Description |
Enter the name of the GL account, up to 50 characters long. This description appears on all inquiries and reports. |
|
|
Account Type |
This field determines how an item behaves, i.e.:
Select the account type:
As an example, let's say you have setup your bank account as an Active account and all your transactions are posted to it. For the purposes of this example, this GL account has been classified as an asset. When the bank account is overdrawn, the GL account reports on the Balance Sheet under the heading of Assets and reports as a negative amount. As another example, a Non-Posting account can be setup for your Bank Overdraft which is classified as a liability GL account. It is linked (paired) to the asset GL account and whenever the balance overdraws, Micronet reports the overdrawn balance to the substitute account (Non-Posting account). The transactions do not move or change from their original location within the Active GL account. The Non-Posting account is simply there to report a balance when circumstances change and reporting needs to reflect it.
When a GL account is designated redundant (changed to Closed), users cannot apply transactions to it. The GL account is removed or purged from the General Ledger after the YTD and LY balances have reset to zero. This only occurs when a General Ledger archive has been performed. |
|
|

|
Warning If an account receives postings via a GL interface, you cannot change it to Closed. When you try to save the change, Micronet displays a message that you need to remove the account from the GL interface first. To close the account, enter a different account on the GL interface (see "Updating a GL Interface Record") and then return to this procedure to close the account. |
|
|
Account Position |
Select the account position for the GL account. This determines the positioning of the account in the Balance Sheet or Profit & Loss report. It also determines the nature of the GL account – that is, whether the account should be a debit or credit balance. Options are:
There are other circumstances under which Bank could be chosen as the account position on a GL account. You may use credit cards or petty cash to pay for some of your expenses. Shareholders may cover expenses and require reimbursement. If these types of GL accounts are set to Bank, you can pay expenses from them as though they were a bank account. This is advantageous where supplier invoices are paid in the Micronet Creditors Ledger and payments are transferred to the General Ledger through integration. In the Payment screen in the MCL, Micronet searches for GL accounts with a Bank setting. If you wish to pay a supplier's invoice with a credit card, you cannot do this from the Creditors Ledger if the GL account for the Credit Card does not have a Bank setting. When you select Bank, you must also complete the Bank Details tab – see "File - GL Accounts - Bank Details".
When creating Undeposited Funds accounts, you must also complete the Undeposited Funds tab – see "File - GL Accounts - Undeposited Funds".
|
|
|
|
Warning It is important to setup the correct account positions. These are used by the Micronet General Ledger GL Summary program which calculates, verifies and reports any differences between the General Ledger and the sub-ledgers. This program does not run correctly if the account positions have not been setup correctly. |
|
|
Total Level |
Enter the degree of information or detail you require within your reporting. You can use this to summarise your Profit & Loss or Balance Sheet reports. For example:
Profit & Loss report at Total Level 2 would produce all accounts above – that is, levels 1 and 2. Profit & Loss report at Total Level 1 would produce only accounts at level 1 – that is, only Total Advertising. If you do not wish to use levels in your reporting, set each GL account to 1. |
||||||||||||||||||||||||||||||||||||||||||||||||||||||||||||||||||||
|
|
Automatic Account |
Automatic accounts are used in MGL transaction posting to automatically post the other side of a journal or transaction. Enter the GL account that is the complementary counterpart, a debit or credit, of the transaction you are entering. For example, if you were setting up an account for wages, the other side of the transaction might be the bank account. The automatic account would be the GL account number for Cash at Bank. |
||||||||||||||||||||||||||||||||||||||||||||||||||||||||||||||||||||
|
|
Indent on Report |
If required, enter the number of characters by which you want the description of the GL account indented when it prints on reports. |
||||||||||||||||||||||||||||||||||||||||||||||||||||||||||||||||||||
|
|
Output Column |
Enter the column number where you want the balance of this GL account placed in a report that displays multiple columns. This option most commonly affects the format of the Balance Sheet report which has three columns. For example, if you entered the following Output Columns:
The Balance Sheet would display as:
Therefore, you would enter 1 as the Output Column for the GL account Cash at Bank, 2 for the GL account Total Current Assets and 3 for the GL account for Total Assets. |
||||||||||||||||||||||||||||||||||||||||||||||||||||||||||||||||||||
|
|
Underline |
If required, select the position of the underline on reports for this GL account. The options are:
Header accounts are generally set to After Single. This setting reports the description of the Header Account with an underline. Total accounts are generally set to Before Single. This setting reports the balance of an account with an underline above the amount. Active Accounts are usually set to None. These settings can be customised to report based on your personal formatting preferences. |
||||||||||||||||||||||||||||||||||||||||||||||||||||||||||||||||||||
|
|
Page Break Before |
Select Yes if you want this GL account to always start on a new page in reports, or No if you don't. The first GL account for a GL department may be set to Yes for Page Break Before. This setting starts the next department’s Profit & Loss report on a new page where a range of departments has been selected to print. |
||||||||||||||||||||||||||||||||||||||||||||||||||||||||||||||||||||
|
|
Blank Lines Before |
Enter the number of blank lines you want before this GL account when printed on a report. |
||||||||||||||||||||||||||||||||||||||||||||||||||||||||||||||||||||
|
|
Blank Lines After |
Enter the number of blank lines you want after this GL account when printed on a report. |
||||||||||||||||||||||||||||||||||||||||||||||||||||||||||||||||||||
|
|
Add to Account |
Enter the number of any account to which the balance of this GL account should be added to or subtracted from in the Profit & Loss and Balance Sheet reports. For example:
You must enter an Add to Account for every Active GL account, and for most Total GL accounts except:
These three GL accounts are the final results of the Profit & Loss and Balance Sheet reports. Therefore, an Add to Account is not necessary. The basic rules applicable to Add to Accounts are:
In the dropdown list next to the Add to Account field, select + if this GL account balance adds to the Total Account entered, or select - if this GL account balance subtracts from the Total Account entered. It is generally recommended that all GL accounts are set to +. Based on the debit and credit nature of GL accounts, Micronet automatically ascertains how these amounts need to be treated. For example:
Micronet treats all credit balances as negative amounts. Therefore, it determines that the nature of the GL account Total Income is a credit balance based on the Account Position Income. It determines that the nature of the GL account Total Expenses is a debit balance based upon the Account Position Expense. If Micronet assumes that credit balances are negative, then it does the following in calculating the Profit & Loss report:
The Profit & Loss does not actually print the credit balances as negative amounts; it simply treats them as negative amounts when it is calculating balances for reports. |
||||||||||||||||||||||||||||||||||||||||||||||||||||||||||||||||||||
|
|
Pair Account |
If this GL account has a complementary pair account, enter the number of the pair account. Pair accounts are accounts with balances that vary from month to month between debit and credit balances, assets and liabilities. You want Micronet to report the balance in the correct accounting classification at any specific point in time. Pair accounts are described above in the Account Type field with account types of Active and Non Posting. You setup one GL account as an Active account and another as a Non Posting account. You then link them using this field (Pair Account) and Micronet reports them correctly depending on the nature of the balance. For example:
Cash at Bank (10680 Active Account) has a pair account setting of 20680 (non posting account). This setting is only required on the active account. The Pair Account field on the non posting account must be left blank. All transactions are posted into 10680 Cash at Bank. Micronet identifies the balance in 10680 Cash at Bank and determines whether it is a debit or credit balance when a report is being compiled. When the balance is a credit, it diverts to 20680 Bank Overdraft and prints in the Current Liabilities section of the Balance Sheet. |
|
|
|
Warning Pair accounts are a one for one relationship. You should not pair multiple accounts to a single GL account. |
|
|
Appropriate Account |
Enter the appropriate account number, if any, for this GL account. Appropriate accounts are generally setup when departments, divisions or cost centres are being maintained within MGL. This feature can be used when administration costs need to be allocated across a range of departments from, for example, a head office.
Total expenses reported in the Administration department for the month are $30,000. Rather than dividing the individual expenses between the departments above manually, Micronet can do this automatically based on the percentage you enter to the right of this field. In the example above, the Appropriate Account would be 20-91990 for all three Admin Expense Allocation accounts – 20-91000, 30-91000 and 40-91000. The percentages would be as follows: 20-91000 set as -100% 30-91000 set as 50% 40-91000 set as 50% Micronet identifies the balance in 20-91990 and reports:
For the Appropriate Accounts feature to operate correctly, the GL accounts with Appropriation Accounts assigned to them must be setup as Total Accounts. For example:
|
|
|
|
Warning The Appropriate Account must have an Account Type of Total. |
|
|
Percentage Account |
If you want the balance of this GL account to be calculated and displayed as a percentage of another account, enter the Percentage Account number. The Percentage Account must be a Total Account. For example, you could have a Salaries and Wages account with another account – Total Sales – as the percentage account.
In this example, the balance of Salaries and Wages for the month is $10,000. The balance of Total Sales is $100,000. The Profit & Loss report calculates Salaries and Wages as a percentage of Total Sales. This percentage of 10% prints next to the balance of Salaries and Wages on this report. |
|
|

|
Technical Tip You must add the percentage field to the Profit & Loss report for these amounts to appear – see "Reports - Report Generator". |
|
|
Budget Matrix |
The budget matrix is a method of retaining multiple budgets within the one ledger. These budgets are stored individually within Micronet and can be linked to individual GL accounts. Each matrix has a unique identification number – a code – that distinguishes it from budgets with different or alternative settings. If you have setup a budget matrix to apply to this GL account, enter the budget matrix code. For more information on budget matrixes, see "File - Budget". |
|
|
Class |
If you have setup different classes for your accounts – e.g. one class for fixed expenses and another for variable expenses – enter the ID of the class this GL account belongs to. For example, GL accounts could be classified as either Fixed or Variable Expenses or as Selling, Operational and Financial. Reports can be written to complement your class structures. |
|
|
BAS Section |
This setting relates directly to the Business Activity Statement report in Micronet. It classifies transactions posted to the GL account based on the GST nature of those transactions. Select how you want the transactions posted to this GL account included in the Business Activity Statement report. Options are:
When users enter transactions in Micronet, the BAS section setting on the GL account defaults when an account has been chosen to classify the transaction. This default can be changed during data entry. In the case of integrated amounts being transferred to General Ledger from other Micronet ledgers, Micronet identifies the BAS Section set to each GL account and tags the transactions with the appropriate BAS Section setting. This default cannot be changed for integrated amounts. This ensures that the Business Activity Statement includes all transactions generated system-wide. |
|
|
Allow GL Postings |
Select Yes if you want users to be able to post transactions to this account, or No if you want to prevent users from posting transactions to this account. |
|
|
Print on Financial Reports |
Select when you want transactions for this account printed on General Ledger financial reports. Options are:
|
|
|
Alternate Account |
An Alternate Account is an alternative GL account number for searching or locating GL accounts in a list. This option can be used where a Chart of Accounts has been changed from one accounting computer system to another. You can enter the former GL account number in this field so that users can search on that number to locate GL accounts in a list. You can enter both alpha and numeric characters. Alternatively, it can be used to record your external accountant’s corresponding account number, proving a mapping for when the GL Trial Balance is printed and provided to your accountant at the end of the year. |
|
|
T3, T4, T5 Compulsory |
If T Accounts have been activated to categorise transactions for reporting, T1 and T2 are always compulsory which means that every transaction entered into Micronet needs to have both T1 and T2 categories applied during data entry. For T3, T4 and T5, you can define whether or not the category is compulsory. The options are:
When a T Account is set as Non Postable, users cannot apply transactions to it. The T Account is removed or purged from the General Ledger where transactions have completely ceased within the previous 12 month period and a General Ledger archive has been performed. For more information about T Accounts, see "T Accounts" and to "File - T Accounts". |